Home > Technical Support > Molding Technology > Molding Technology for TOPAS(R) COC
Cautions in molding
2. Cautions in molding 2.1 Recommended material change method For changeover from any other material to TOPAS® COC, it is recommended to directly clean the screw, cylinder and nozzle by disassembling the plasticizing unit. Rub off contamination, etc., with a brass brush or the like. Resin adherents, if any, can be easily removed by heating up to the resin's glass transition temperature (Tg) or more. Note that the initial portion of plasticization of the screw, the inside of the backflow prevention valve, and the inner wall of the nozzle tip, to which resins easily adhere, are dirty in many cases.
2.2 Simple material change methods There are cases where the plasticizing unit is difficult to disassemble and clean for low-volume trial production or due to a schedule conflict. In this case, materials are changed by purging. Changeover to a transparent resin by purging is difficult, and due caution is required for low-viscosity TOPAS in particular. Example methods of changeover from various resins are shown below. If material replacement fails by these methods, the plasticizing unit will need to be disassembled and cleaned. Consult with us for efficient purging methods, which vary with the types of molding machines and with plasticizing units.
(1) Changeover to the TOPAS 5013 family Since the TOPAS 5013 family is extremely low in viscosity, a direct change from any other material cannot be made by purging. Therefore, the other resin should be replaced first by purging with the TOPAS 6013 family that is slightly high in viscosity, and then purged with the TOPAS 5013 family to complete replacement. For changeover to the TOPAS 5013 family by purging, preparation of a resin in the TOPAS 6013 family is requested. Points to be noted before changeover to such a resin in the TOPAS 6013 family are in accordance with (2).
(2) Changeover to any other resin than the TOPAS 5013 family As the effects of purging differ according to the type and viscosity of the previous resin, example methods are shown below. (a) When the previous material is a high-viscosity resin First replace the common material with a purging material of the lowest possible viscosity, such as PP or PE. If replacement with a low-viscosity purging material, such as PP or PE, is impossible, first use a high-viscosity one, and then replace with a low-viscosity one. Note that if this replacement is inadequate, non-defective products cannot be finally obtained. After this, increase to the molding temperature of the TOPAS to be molded and purge it.
(b) When the previous material is a low-viscosity resin First, replace the common material with a low-viscosity purging material, such as PP or PE. After this, increase to the molding temperature of the TOPAS to be molded and purge it.
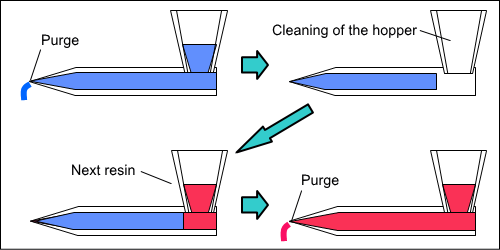
(c) When the previous material is COC or COP Increase to the molding temperature of the TOPAS to be molded and purge it. However, since COC or COP gets oxidized by oxygen in air to form carbides, keep the cylinder filled with resin. Specifically, when the previous material disappears from the hopper opening, immediately stop the screw to keep the cylinder filled with the previous resin. Next, clean the hopper, etc., input TOPAS and proceed with purging. Where nitrogen is injected into the hopper, perform purging while it is injected. To perform purging while keeping the cylinder filled with the resin is the point
In order to prevent oxidation, temporarily halt molding by the following methods. For lowering cylinder temperature, stop the screw after the metering process where possible. Since screw movements are to start from the injection process after reheating, even if part of the resin is not melted due to some trouble, abnormality can be detected by the fact that the screw does not go forward. If movements start from the rotation process after reheating, the twist-sensitive screw may break when some trouble occurs.
(1) Halt of several tens of minutes to about one hour Halt as the screw and hopper are filled with resin together with nitrogen if it is to be injected in the hopper. Start molding after purging the residual resin.
(2) Halt of several hours to about half a day Decrease cylinder temperature down to near Tg+10°C as screw and hopper are filled with resin together with nitrogen if it is to be injected in the hopper. Increase cylinder temperature to molding temperature, purge residual resin, and then start molding.
(3) Halt of half a day to several days Decrease cylinder temperature down to near Tg+10°C as the screw is filled with resin together with nitrogen if it is to be injected in the hopper. Redo drying of the resin in the hopper before resumption of molding. Increase cylinder temperature to molding temperature, purge residual resin, and then start molding.
(4) Halt of several days or more Turn off heater and decrease cylinder temperature as the screw is filled with resin together with nitrogen if it is to be injected in the hopper. Stop nitrogen when cylinder is sufficiently cooled down. Redo drying of the resin in the hopper before resumption of molding. For resumption of molding, inject nitrogen in the hopper three hours or more before start of molding, and increase cylinder temperature up to near Tg+10°C. After three hours or more have passed in this condition, increase cylinder temperature to molding temperature, purge residual resin, and then start molding.
Fig. 2-1 Illustrated example of changeover from COP or COC
|